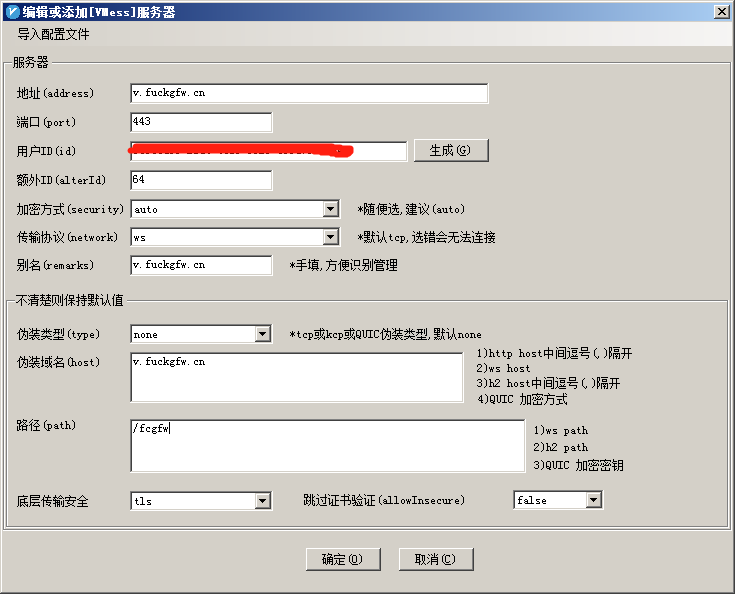
Nginx V2ray and WebSocket

安装v2ray/nginx v2ray安装可以参考Ubuntu中v2ray客户端配置实例. Nginx安装推荐使用OneinStack一键安装脚本 准备好使用的域名,这里以**v.fuckgfw.cn**为例。 v2ray/nginx服务端配置 v2ray安装好后,服务端配置**/etc/v2ray/config.json**如下: { "inbounds": [{ "port": 99999, //代理端口号 "listen": "127.0.0.1", "protocol": "vmess", "settings": { "clients": [{ "id": "5c1eed18-fse4-41fs-9as9-e85s45bds9ef", "level": 1, "alterId": 64 }] }, "streamSettings": { "network": "ws", "wsSettings": { "path": "/fcgfw" //代理目录 } } }], "outbounds": [{ "protocol": "freedom", "settings": {} }, { "protocol": "blackhole", "settings": {}, "tag": "blocked" }], "routing": { "rules": [{ "type": "field", "ip": ["geoip:private"], "outboundTag": "blocked" }] } } 使用OneinStack一键脚本新建一个站点,域名为v.fuckgfw.cn,采用SSL加密模式,完成后编辑**/usr/local/nginx/conf/vhost/v.fuckgfw.cn.conf**文件 ...

七月 30, 2020 · JQX

StartSSL免费证书与Nginx配置

注册StartSSL 打开https://www.startssl.com/,点击Sign-up开始注册 参考上图填写注册信息,然后Continue,会有如下提示,系统会发送验证码到你的注册邮箱 检查注册邮箱,将收到的验证码填写提交,然后会出现如下提示,等待审核。 审核通过后,会收到如下提示邮件,点击其中连接,然后输入邮箱中的验证码完成注册 安装证书 接下来创建私匙 安装证书 安装成功后会有如下提示 验证域名 接下来验证域名,点击Validations Wizard 填写域名 选择验证邮件地址 按照提示输入邮箱接收到的验证码完成验证。 创建证书 选择Certificates Wizard,证书目标选择Web Server SSL/TLS Certificate 接下来新建私匙 点击Skip跳过系统建立步骤,我们自己在VPS上建立CSR文件,参考下图通过openssl命令建立CSR文件 注意,为了便于后期安装配置方便,建议密码置空 完成后,cat出建立好的ciuxsss.csr内容,粘贴提交 接下来添加域名 接下来将文本框中的内容保存为一个**.crt**文件 配置Nginx 贴出我的配置文件,大家参考一下 server { listen 80; location /{ return 301 https://$host$request_uri; } } server { listen 443; #listen 80; #listen [::]:80; server_name ciux.org; index index.html index.htm index.php default.html default.htm default.php; root /home/ciux/compiled; ssl on; ssl_certificate /home/bk/ssl/ciuxsss.crt; ssl_certificate_key /home/bk/ssl/ciuxsss.key; ssl_session_timeout 5m; ssl_protocols SSLv2 SSLv3 TLSv1; ssl_ciphers ALL:!ADH:!EXPORT56:RC4+RSA:+HIGH:+MEDIUM:+LOW:+SSLv2:+EXP; ssl_prefer_server_ciphers on; …… 其中第一个Server是将所有80端口的http访问301重定向到443端口的https访问。 ...

十月 14, 2015 · JQX

Nginx配置SSL证书

申请Wosign免费SSL证书 申请地址: https://www.wosign.com/products/free_ssl.htm 申请成功后,收到类似于aquan.me_sha256_cn.zip的文件,解压后包含如下文件 for Apache.zip for IIS.zip for Nginx.zip for Other Server.zip for Tomcat.zip 其中for Nginx.zip中包含如下两个文件,将其上传到VPS自定义位置。 1_aquan.me_bundle.crt 2_aquan.me.key 配置Nginx 不多说了,直接贴代码: #### Add Wosign SSL Start #### listen 443; ssl on; ssl_certificate /usr/local/nginx/ssl/ssl.crt; ssl_certificate_key /usr/local/nginx/ssl/ssl.key; ssl_session_timeout 5m; ssl_protocols SSLv2 SSLv3 TLSv1; ssl_ciphers ALL:!ADH:!EXPORT56:RC4+RSA:+HIGH:+MEDIUM:+LOW:+SSLv2:+EXP; ssl_prefer_server_ciphers on; #### Add Wosign SSL End #### 将以上代码插入listen 80;之后。 重启Nginx生效 /etc/init.d/nginx restart 以上设置完成,就可以通过https来浏览网站,同时http也可以浏览。 ...

五月 25, 2015 · JQX

树莓派与DNSPod动态域名解析

所需条件 Raspberry Pi TP-Link路由器 DNSPod帐户 域名 配置路由器 进入路由器的DHCP服务器->静态地址分配菜单,为Raspberry Pi分配静态IP地址,例如:192.168.1.200 进入路由器的安全功能->远端WEB管理菜单,设置WEB管理端口为一个非80值,例如82 进入路由器的转发规则->DMZ主机菜单,将DMZ主机IP地址设置为Raspberry Pi的ip地址,然后启用保存。 设置DNSPod动态域名解析 首先登录DNSPod网页管理域名,将二级域名www 的A记录解析到路由器外网IP(可通过路由器管理首页查询,或者通过浏览ip138.com来获得) 注:一级域名请解析**@**的A记录。 下载DNSPod官方客户端Lite https://support.dnspod.cn/Support/api 解压后双击打开登录,从右侧信息列表中也可以看到本机最新IP,点击相应域名后的动态解析按钮,在动态解析设置中右键点击相应的动态记录启用即可,关闭DNSPod官方客户端Lite。 设置Raspberry Pi 安装Web服务器软件(Nginx) apt-get install nginx /etc/init.d/nginx start 内网可以通过浏览`http://192.168.1.129"来检查Nginx是否正常运行。 下载动态域名解析脚本(pypod.py) http://qn.optipng.cn/res/pypod.py 编辑pypod.py修改以下内容: login_email="email", # DSNPod帐户邮箱 login_password="password", # DSNPod帐户密码 domain_id=100, # 域名id record_id=100, # 记录id sub_domain="www", # 子域名 其中域名id与记录id可以通过以下命令获取: curl -k https://dnsapi.cn/Domain.List -d "login_email=xxx&login_password=xxx" curl -k https://dnsapi.cn/Record.List -d "login_email=xxx&login_password=xxx&domain_id=xxx" 提示:如果你使用了www子域名,则需要获取www的记录id,如果使用一级域名(@),则需要获取**@**的记录id。 编辑完pypod.py保存退出,使用以下命令运行: python pypod.py 现在可以通过域名来浏览Raspberry Pi上的Web内容了。 pypod.py开机运行 添加/usr/bin/python /home/pi/pypod.py到**/etc/rc.local**。

三月 3, 2014 · jqx

LNMP使用实例

安装LNMP 更新系统 yum check-update yum update 安装Screen yum install screen 开始安装Lnmp screen -S lnmp wget -c http://soft.vpser.net/lnmp/lnmp0.8.tar.gz //最新版请查阅lnmp官网 tar zxvf lnmp0.8.tar.gz ./lnmp0.8/centos.sh | tee lnmp.log //输出log文件,以备出错时查阅 接下来按照提示设定域名和MysQL密码,程序会自动下载相关程序,而后编译安装 安装PureFTP ./lnmp0.8/pureftp.sh 按提示输入MySQL和Ftp管理员密码,安装完成后可以通过http://vpsip/ftp/来登录管理ftp帐号 使用Lnmp 添加虚拟主机 /root/vhost.sh 按照提示填入域名、目录、rewrite规则文件,如下所示: root@buyvm256:~#/root/vhost.sh ========================================================================= Add Virtual Host for LNMP V0.9 , Written by Licess ========================================================================= LNMP is a tool to auto-compile & install Nginx+MySQL+PHP on Linux This script is a tool to add virtual host for nginx For more information please visit http://www.lnmp.org/ ========================================================================= Please input domain: //添加域名 (Default domain: www.lnmp.org):unixetc.com =========================== domain=unixetc.com =========================== Do you want to add more domain name? (y/n) //添加更多域名 y Type domainname,example(bbs.vpser.net forums.vpser.net luntan.vpser.net): www.unixetc.com =========================== domain list=www.unixetc.com =========================== Please input the directory for the domain:unixetc.com : //网站目录 (Default directory: /home/wwwroot/unixetc.com): =========================== Virtual Host Directory=/home/wwwroot/unixetc.com =========================== =========================== Allow Rewrite rule? (y/n) //重写规则 =========================== y Please input the rewrite of programme : wordpress,discuz,typecho,sablog,dabr rewrite was exist. (Default rewrite: other):wordpress //选择重写规则 =========================== You choose rewrite=wordpress =========================== =========================== Allow access_log? (y/n) //是否记录log =========================== n Press any key to start create virtul host... 然后,登录http://vpsip/ftp/添加ftp帐号,http://vpsip/phpmyadmin/编辑数据库 ...

三月 23, 2012 · JQX