UNIXETC
VPS安装飞牛OS
首先备份你的网络配置,以防止安装后网络配置异常,那么就需要手动配置网络。
root@bwg:~# ip a
 eth0: <BROADCAST,MULTICAST,UP,LOWER_UP> mtu 1500 qdisc mq state UP group default qlen 1000
    link/ether aa:aa:00:07:cc:07 brd ff:ff:ff:ff:ff:ff
    altname enp0s18
    altname ens18
    inet 55.62.158.62/22 brd 55.62.158.255 scope global eth0
       valid_lft forever preferred_lft forever
    inet6 fe80:1e20:13aa:ff:fe07:cc07/64 scope link
       valid_lft forever preferred_lft forever
ssh登录vps,按照以下示例操作:
## 下载脚本
wget --no-check-certificate -qO InstallNET.sh 'https://unixetc.com/res/InstallNET.sh'
## 添加执行权限
chmod a+x InstallNET.sh
## 通过脚本安装网络镜像,这个过程时间可能较长,因为要下载fnos.vhd.gz镜像文件。
./InstallNET.sh --image 'https://r2.yx.lu/fnos.vhd.gz'
完成后开始自动执行安装过程
# System Memory

785 MB

# Virtualization and Manufacturer

kvm redhat

# Check Dependence

[ok]            awk
[ok]            basename
[ok]            cat
[ok]            cpio
[ok]            curl
[ok]            cut
[ok]            dirname
[ok]            file
[ok]            find
[ok]            grep
[ok]            gzip
[ok]            iconv
[ok]            ip
[ok]            lsblk
[ok]            openssl
[ok]            sed
[ok]            wget

# Network Details

[Adapter Name]  eth0
[Network File]  /etc/network/interfaces
[Server Stack]  IPv4Stack

[IPv4  Method]  isDHCP
[IPv4 Address]  55.62.158.62
[IPv4  Subnet]  255.255.252.0
[IPv4 Gateway]  55.62.158.255
[IPv4     DNS]  8.8.8.8 1.1.1.1
[IPv4  Amount]  1

[IPv6  Method]  N/A
[IPv6 Address]  N/A
[IPv6  Subnet]  N/A
[IPv6 Gateway]  N/A
[IPv6     DNS]  N/A
[IPv6  Amount]  N/A

# User Timezone

Asia/Shanghai

# Hostname

bwg

# SSH or RDP Port, Username and Password

N/A
N/A
N/A

# Formatting and Installing Drives

/dev/sda

# Motherboard Firmware

BIOS

# Check DIST

Success

# Installation Starting

Overwriting Packaged Image Mode Target System [Self-Modified OS]
https://r2.yx.lu/fnos.vhd.gz

[Debian] [bookworm] [amd64] Downloading...
[Mirror] http://deb.debian.org/debian/dists/bookworm/main/installer-amd64/current/images/netboot/debian-installer/amd64/initrd.gz
         http://deb.debian.org/debian/dists/bookworm/main/installer-amd64/current/images/netboot/debian-installer/amd64/linux
268486 blocks

# Directory of Grub and Unattended Disposition File

/boot/grub/grub.cfg
/tmp/boot/preseed.cfg

[Finish] Input 'reboot' to continue the subsequential installation.
按照提示输入reboot重启系统开始安装fnOS。
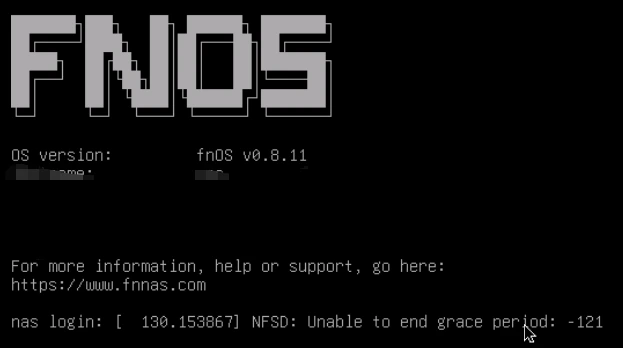
通过vnc面板可以查看安装过程是否完成,如下提示完成即可,然后通过http://ip:8000访问系统进行设置,默认账号密码为mjj mjj@123

修改fnOS默认软件源
fnOS默认的软件源为清华大学国内源,在国外的vps上使用反而访问效果不佳,因此建议修改为国外软件源。
首先在系统后台打开账户的SSH访问功能,然后登录系统参考如下操作。
## 备份并替换apt源
cd /etc/apt/
mv sources.list sources.list.bak
wget https://unixetc.com/res/fnos/sources.list

## 备份并替换docker源
cd /etc/apt/sources.list.d
mv docker.list docker.list.bak
wget https://unixetc.com/res/fnos/docker.list
apt update
修改fnOS Swap大小
fnOS是基于debian的系统,可以参考以下使用一键脚本修改swap大小。
wget https://unixetc.com/res/swap.sh
chmod +x ./swap.sh
./swap.sh
修改fnOS数据盘
安装完成后发现数据盘只有5G大小,看样子还有一部分硬盘没被识别,需要ssh登录后台手动修改下分区信息。
设置->SSH->勾选SSH功能,然后在用户管理中为当前用户启用SSH功能。
ssh mjj@ip连接服务器。
## 切换到root账号
sudo -s
## 查看当前分区信息,可以看到`/dev/vda`磁盘大小为931.1G,但只建立了一个5G大小的`/dev/vda3`分区
root@nas:/# lsblk
NAME   MAJ:MIN RM   SIZE RO TYPE MOUNTPOINTS
sr0     11:0    1   368K  0 rom
vda    254:0    0 931.1G  0 disk
├─vda1 254:1    0    94M  0 part
├─vda2 254:2    0   7.9G  0 part /
└─vda3 254:3    0     5G  0 part

## 下来删除vda3分区,将剩余的磁盘分成一个分区
root@nas:/# fdisk /dev/vda

Welcome to fdisk (util-linux 2.38.1).
Changes will remain in memory only, until you decide to write them.
Be careful before using the write command.

GPT PMBR size mismatch (27262975 != 1952710655) will be corrected by write.
The backup GPT table is not on the end of the device. This problem will be corrected by write.
This disk is currently in use - repartitioning is probably a bad idea.
It's recommended to umount all file systems, and swapoff all swap
partitions on this disk.


Command (m for help): p

Disk /dev/vda: 931.13 GiB, 999787855872 bytes, 1952710656 sectors
Units: sectors of 1 * 512 = 512 bytes
Sector size (logical/physical): 512 bytes / 512 bytes
I/O size (minimum/optimal): 512 bytes / 512 bytes
Disklabel type: gpt
Disk identifier: 3B500D66-3E07-4BC5-9D85-F06893DEE158

Device        Start      End  Sectors  Size Type
/dev/vda1      2048   194559   192512   94M BIOS boot
/dev/vda2    194560 16777215 16582656  7.9G Linux filesystem
/dev/vda3  16777216 27260927 10483712    5G Linux filesystem

Command (m for help): d  ## 使用d命令删除分区
Partition number (1-3, default 3):  ## 选择第三个分区

Partition 3 has been deleted.
Command (m for help): n  ## 新建分区
Partition number (3-128, default 3):    ## 采取默认直接回车键
First sector (16777216-1952710622, default 16777216):  ## 采取默认直接回车键
Last sector, +/-sectors or +/-size{K,M,G,T,P} (16777216-1952710622, default 1952708607):
## 将剩余的923.1G全部新建为分区3
Created a new partition 3 of type 'Linux filesystem' and of size 923.1 GiB.
Command (m for help): w  ## 将修改操作写入磁盘
The partition table has been altered.
Syncing disks.

## 查看下最新分区信息,其中/dev/vda3就是我们新建的分区。
root@nas:/# fdisk -l
Disk /dev/vda: 931.13 GiB, 999787855872 bytes, 1952710656 sectors
Units: sectors of 1 * 512 = 512 bytes
Sector size (logical/physical): 512 bytes / 512 bytes
I/O size (minimum/optimal): 512 bytes / 512 bytes
Disklabel type: gpt
Disk identifier: 3B500D66-3E07-4BC5-9D85-F06893DEE158

Device        Start        End    Sectors   Size Type
/dev/vda1      2048     194559     192512    94M BIOS boot
/dev/vda2    194560   16777215   16582656   7.9G Linux filesystem
/dev/vda3  16777216 1952708607 1935931392 923.1G Linux filesystem
下来,进入到fnos web后台,设置->存储空间管理->创建存储空间,就可以看到我们新建的分区了。